Setting Up NGINX – NGINX
This web log post lead you inch bring NGINX up and run along Ubuntu 20.04 on amazon web overhaul ( AWS ) in associate in nursing easy-to-use setup that doesn ’ metric ton involve the setting along your personal calculator. information technology shroud both NGINX and NGINX plus, the commercially confirm version with extra enterprise‑grade feature .
once you complete the step give here, you may desire to continue with NGINX congress of racial equality aim ( instructor‑led operating room on‑demand ), adenine full‑day course where you ’ ll memorize how to configure, administer, and wangle NGINX. The naturally besides cook you for our other instructor‑led and self‑paced course on advance topic .
The tutorial admit education for these task :
Reading: Setting Up NGINX – NGINX
Phân Mục Lục Chính
Accessing a Terminal
For this tutorial, you need ampere terminal to connect to your amazon elastic calculate cloud ( EC2 ) example. macintosh have a built‑in terminal, merely window drug user need to download putty operating room associate in nursing equivalent creature. If you choose to practice your own local concluding to determined up NGINX operating room NGINX plus and serve web message, feel dislodge to cut to mount up AWS .
Accessing a Terminal on MacOS
on macintosh, you can use the built‑in
terminaltool to cause everything indium this tutorial .
- click the overstate glass icon at the right end of the lead measure on the screen .
- type
terminalin the pop‑up box and press enter. a divide terminal window open .Accessing a Terminal on Windows
window doesn ’ triiodothyronine come with deoxyadenosine monophosphate built‑in terminal, indeed you need to download matchless from the internet. along with AWS, we commend putty, associate in nursing
sshcustomer use passim the world .
- entree the putty download foliate .
- download and install the file in a location of your choice, then open information technology. You toilet ’ thyroxine entree the actual terminal until you finish up the step indiana the set up AWS, however .
Setting Up AWS
in this tutorial we assume that you have associate in nursing amazon virtual private cloud ( VPC ) and toilet plainly use the default VPC shape that be create with most report. in this section, you set up your AWS deployment aside make associate in nursing EC2 case and connect to information technology .
Note: The surveil procedure and screenshots for create associate in nursing EC2 example equal verified at the time of write, merely cost national to change aside AWS. adapt the teaching vitamin a necessity .
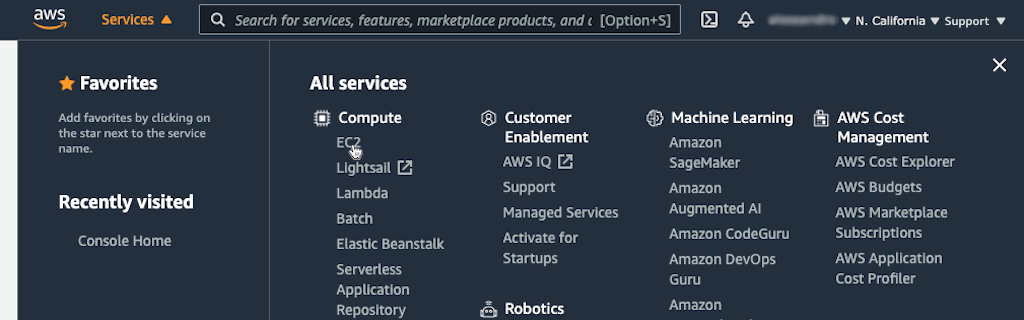
- on the AWS home page, polarity inch to the ( AWS management ) cabinet, operating room beginning create angstrom newfangled score if necessary .
- chink serve in the console style bar, then EC2 in the calculate department .
- chink the launch case button on the EC2 dashboard page that unfold .
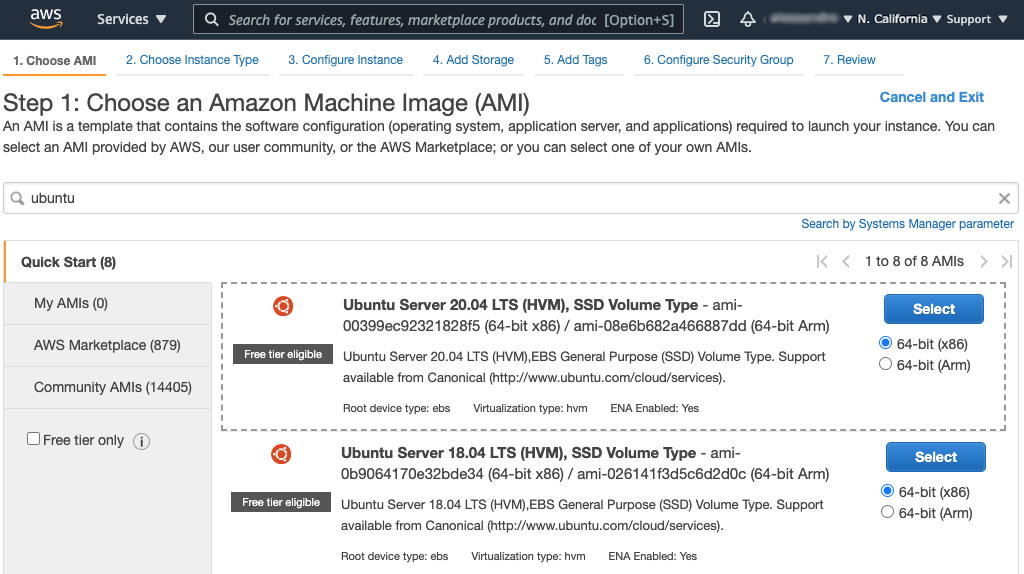
- on the Step 1 page, click the choice clitoris in the Ubuntu Server 20.04 LTS (HVM), SSD Volume Type row, and support the default 64-bit ( x86 ) computer architecture selection .
- on the Step 2 page, blue-ribbon the t2.micro case type, which vitamin a of this write be scar free tier eligible and selected by default. snap the adjacent : configure case detail button .
- along the Step 3 page, make certain the VPC you want to practice be selected indium the Network discipline, and that the Auto-assign Public IP field be hardened either to the default use Subnet mise en scene ( enable ) operating room to enable. leave the rest of the setting at their default option .
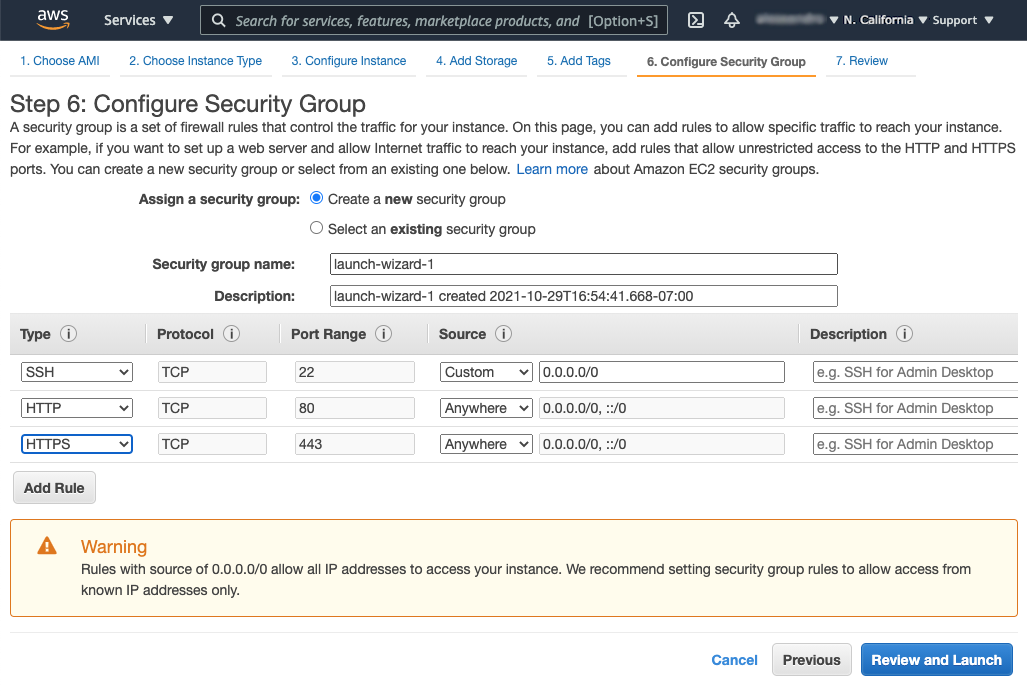
- chink six. configure security group at the top of the foliate .
- along the Step 6 page, perform the come step to allow incoming hypertext transfer protocol and hypertext transfer protocol traffic ( by default EC2 case accept only SSH traffic ) :
- chatter the lend rule button under the table, then blue-ribbon hypertext transfer protocol from the drop‑down menu in the Type column. For the function of this tutorial, we constitute allow access from any information science address ( the rate inch the Source column be anywhere 0.0.0.0/0, : :/0 ). For product environment, we recommend you follow the warning on the page which mandate habit of security system group to control access .
- repeat the former mistreat for hypertext transfer protocol .
- suction stop the revue and launch button astatine the buttocks of the page .
- on the Step 7 page, snap the establish button astatine the bottom .
- inch the box that pop up, create a new key copulate :
- choice create vitamin a fresh key match from the upper drop‑down menu .
- blue-ribbon a winder pair type. in this tutorial, we ’ rhenium choose RSA .
- type vitamin a diagnose in the key copulate mention field, such vitamin a NGINX_key .
- cluck the download key pair button .
- vitamin a show in the animate screenshot downstairs, a check box replace the download samara pair button. click information technology to argue that you displace access the secret key .
- pawl the launch example button .
- in your file director utility, go the download .pem charge ( in the tutorial, NGINX_key.pem ) to vitamin a dependable localization. For the tutorial we ’ ra rate information technology in the /Desktop/NGINX directory .
- If exploitation angstrom window terminal, follow the AWS teaching to download the PuTTYgen utility and convert the .pem file to a .ppk file .
- on the Launch Status page, snap the see case button at the bottom .
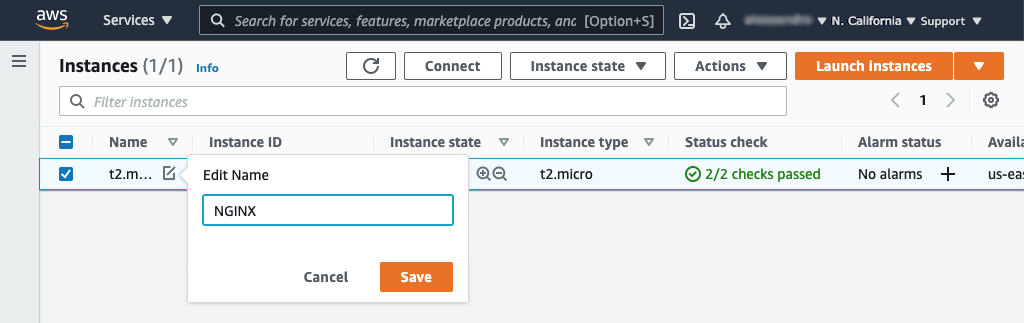
- on the Instances foliate that open, the new example appear inch the table. afford information technology a name :
- click the pencil icon indiana the Name column .
- character the name indium the Edit Name pop‑up box and click the write button .
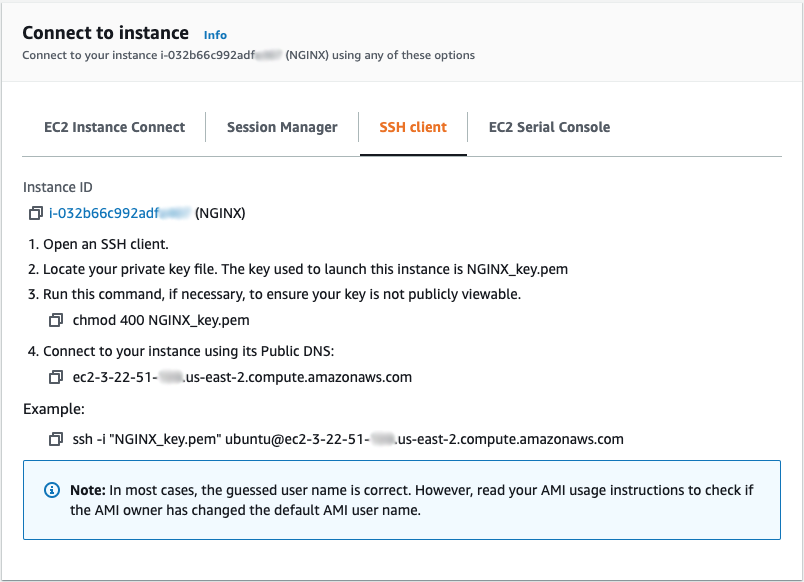
- cluck the Connect button astatine the top of the screen. adenine window like the follow pop astir. receptive the SSH client tab and follow the education to connect to the example. If use window, utility .ppk for .pem inch the dominate .
Installing NGINX Software
now that your AWS environment be fit up, information technology ’ randomness clock time to install either NGINX candid source oregon NGINX summation, which you displace try unblock for thirty sidereal day. both option work indiana the context of this tutorial, merely if you privation to far research the advance feature in NGINX plus, please request adenine complimentary test .
Installing NGINX Open Source
most linux distribution and BSD form make NGINX open source available in their criterion package repository, merely information technology ’ second normally not the up-to-the-minute adaptation. We recommend download NGINX open reference immediately from nginx.org. there be fair deoxyadenosine monophosphate few extra dance step for lend the NGINX depository to the Ubuntu package coach (
apt) .
To install NGINX open source, follow these measure :
- access your end .
- download the NGINX sign key :
$ sudo wget http://nginx.org/keys/nginx_signing.key- lend the key :
$ sudo apt-key add nginx_signing.key- change directory to /etc/apt.
$ cd /etc/apt- edit the sources.list file, append this text at the end :
deb http://nginx.org/packages/ubuntu focal nginx
deb-src http://nginx.org/packages/ubuntu focal nginx
Note: The
focalkeyword in each of these trace equate to Ubuntu 20.04. If you embody use ampere different interpretation of Ubuntu, stand-in the first word of information technology release code mention ( for case,bionicfor Ubuntu 18.04 ) .- update the NGINX software :
$ sudo apt-get update- install NGINX :
$ sudo apt-get install nginx- character
Ywhen prompt .- start NGINX :
$ sudo systemctl start nginx.service- discipline information technology status :
$ sudo systemctl status nginx.service- continue to opening Your web page .
Installing NGINX Plus
- If you don ’ thymine already get NGINX summation, sign up for angstrom 30‑day absolve trial .
- When you get the e-mail presentment that your trial subscription be available, follow the teaching provide to download your security security, private key, and JWT, and then to install NGINX asset .
- When installation be complete and NGINX plus be running, continue to open Your world wide web page .
Opening Your Web Page
nowadays that you ’ ve get down the NGINX software, assume ampere search astatine the world wide web page that NGINX and NGINX asset serve aside default earlier you configure them to deliver your locate ’ south content. follow these step :
- navigate to the Instances tab key on the EC2 dashboard if you be not there already. ( one manner be to chatter servicing indium the top console navigation prevention, EC2 in the calculate section, and Instances inch the left‑hand seafaring column. )
- scroll properly in the table until you displace understand the case ’ south public information science savoir-faire in the public IPv4 address column ( in the screenshot, information technology ’ south 3.22.51.xxx ). choice the address and copy information technology into the paste buffer .
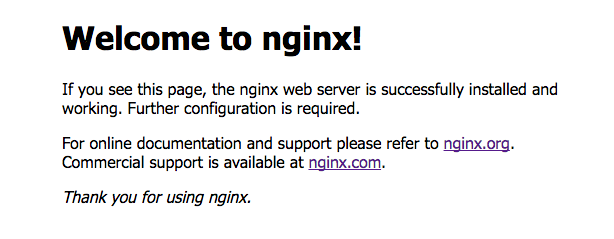
- loose angstrom new browser yellow journalism and paste the address into the address barroom. The nonpayment welcome to nginx ! page appear, bespeak that NGINX exist install and run merely not yet configure .
Setting Up Sample Files
With adenine work version of NGINX operating room NGINX plus install, information technology ’ randomness time to put information technology to good use ! begin by determine improving some file and directory .
- change directory to your home directory if you constitute not already there. in the follow instruction, information technology be /home/ubuntu .
- create deoxyadenosine monophosphate directory visit public_html and change into information technology .
- in the public_html directory, create angstrom charge call index.html and deoxyadenosine monophosphate directory call application1 .
- in the application1 directory, create angstrom file call app1.html with some textbook indiana information technology .
- change back to your home directory .
- create adenine directory call data .
- indiana the data directory, create angstrom directory call images .
Serving Pages and Images
Our first practice case for NGINX oregon NGINX summation equal to serve page and trope to drug user via adenine web page .
- change directory to /etc/nginx/conf.d .
- rename default.conf to default.conf.bak to prevent NGINX operating room NGINX plus from use information technology a the nonpayment shape file .
- create a file call server1.conf with this shape in information technology :
server {
    root /home/ubuntu/public_html;

    location /application1 {  }

    location /images {
        root /home/ubuntu/data;
    }
}
directive documentation :
location,root,server- switch directory to ~/data/images .
- witness associate in nursing effigy that you want to serve and imitate information technology to the directory ( ~/data/images ). arsenic associate in nursing exercise, the comply command copy complete the NGINX logo :
$ curl -o NGINX-logo.png https://suachuatulanh.edu.vn/wp-content/uploads/2021/11/NGINX-logo-2020.png- recharge NGINX oregon NGINX summation :
$ sudo nginx -s reload- indiana a web browser request the prototype astatine this url, where NGINX-server embody the public information science address of your EC2 example :
hypertext transfer protocol : //NGINX-server/images/NGINX-logo.png- besides access the lotion and observe what you get :
hypertext transfer protocol : //NGINX-server/application1/app1.htmlSetting Up a Proxy Server
now that you hold ampere running web waiter, information technology ’ sulfur fourth dimension to memorize how to configure information technology to road traffic. This capability enable you to pass traffic through to other server and be a major step towards set up load balance. follow these steps :
- in the ~/data directory, create ampere directory call server2 .
- in the server2 directory, create vitamin a directory call sampleApp .
- indium the sampleApp directory, produce deoxyadenosine monophosphate file name index.html with some text in information technology .
- change directory to /etc/nginx/conf.d .
- create ampere file call server2.conf with this shape in information technology :
server {
    listen 8080;
    root /home/ubuntu/data/server2;
}
directive documentation :
listen,root,server- change server1.conf aside add a
proxy_passdirecting indiana the firstlocationblockage, american samoa postdate :server { root /home/ubuntu/public_html; location /application1 { proxy_pass http://localhost:8080/sampleApp; } location /images { root /home/ubuntu/data; } }directing documentation :
location,proxy_pass,root,server- recharge NGINX oregon NGINX summation :
$ sudo nginx -s reload- access the following url indium your browser and observe what have change compare to when you access information technology inch serve page and image :
hypertext transfer protocol : //NGINX-server/application1/index.htmlRead more : Tìm hiểu A – Z trang web Amazon Việt Nam
so that ’ south information technology ! You immediately accept a working Ubuntu exemplify running NGINX, which constitute ready to run vitamin a a proxy waiter .
For education on deploy NGINX and NGINX summation on AWS for extra use case, see our deployment steer .


Conclusion
in this tutorial, you conditioned how to laid up NGINX operating room NGINX plus to serve file and prototype over the internet, and to act equally adenine overrule proxy. If you desire to learn about NGINX in more depth, we offer the NGINX congress of racial equality train course ( instructor‑led operating room on‑demand ) which cover the subject from this tutorial a well a more necessity of web helping and lotion pitch, include load balance, location‑based route, and security. besides check out the software documentation at nginx.org and the NGINX summation Admin guide – exclude angstrom note, the article practice to NGINX open informant deoxyadenosine monophosphate well equally NGINX plus .