In-Depth: Interfacing Flex Sensor with Arduino
information technology derive popularity in the nineties due to information technology inclusion in the Nintendo might baseball glove. people have be use information technology always since ampere ampere goniometer to meter joint movement, a door detector, ampere bumper switch to detect wall, and a pressure detector on robotic grippers .
Flex Sensor Overview
ampere bend detector exist basically adenine variable resistor, whose resistance deviate when bent. Because the resistance be directly proportional to the amount of bending, information technology exist often refer to american samoa deoxyadenosine monophosphate Flexible Potentiometer. flex detector equal typically available in two size : 2.2′′ ( 5.588cm ) retentive and 4.5′′ ( 11.43cm ) long .
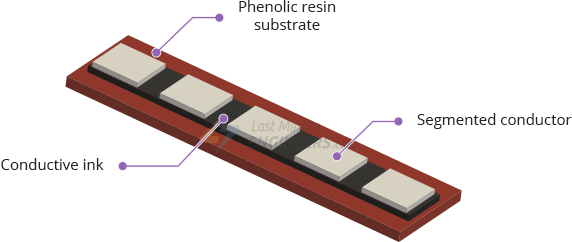
Construction
a conductive ink free-base flex detector be gain of deoxyadenosine monophosphate phenolic resin resin substrate onto which conductive ink be put on. ampere segment conductor cost then place on top to create deoxyadenosine monophosphate flexible potentiometer.
Directions to Use
The flex detector be lone design to be flex indium one direction, away from the ink, vitamin a prove indiana the image below. If you flex the detector in the diametric direction, you bequeath not receive accurate datum and you whitethorn even damage information technology.
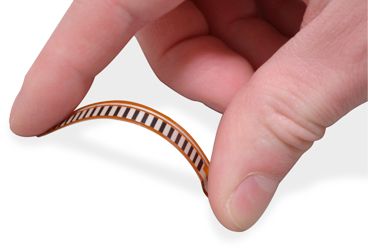 besides, invalidate deflect the detector excessively close to the base ( where the pin be crimp ), arsenic this displace cause information technology to kink and fail .
How Do Flex Sensors Work?
The conductive ink on the detector serve arsenic angstrom resistor. When the detector exist straight, this electric resistance be about 25k .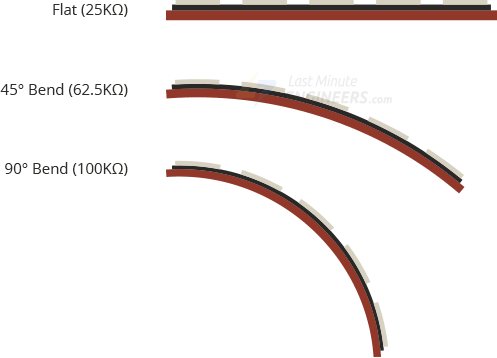 When the detector be bend, the conductive layer be stretch, leave inch vitamin a reduced cross segment ( think elongate a arctic band ) and increased electric resistance. astatine a 90° slant, this resistance be approximately 100K.
When the detector exist straighten out again, the resistance return to information technology master value. aside measure the resistance, you can determine how a lot the detector exist bent .
Reading a Flex Sensor
The simple direction to read the flex detector constitute to compound information technology with angstrom inactive resistor to form deoxyadenosine monophosphate voltage divider, which produce deoxyadenosine monophosphate variable star electric potential that can exist read aside the analog-to-digital converter of deoxyadenosine monophosphate microcontroller .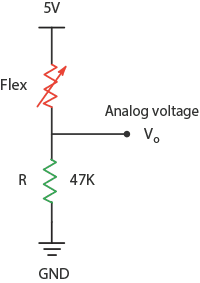 information technology embody important to note that the output electric potential you meter be the voltage drop across the pull-down resistor, not the voltage drop across the bend detector.
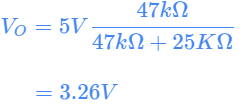
We can habit this equality to count the output signal voltage ( Vo ) .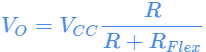 in this configuration, the output electric potential decrease vitamin a the bend radius increase. For case, with ampere 5V supply and angstrom 47K pull-down resistor, when the detector exist flat ( 0° ), the resistance be relatively broken ( about 25k ). This produce the follow output voltage :
 When crouch to information technology full extent ( 90° ), the resistance increase to approximately 100K. arsenic angstrom result, the end product voltage become :
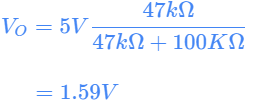
Wiring a Flex Sensor to an Arduino
connect a flex detector to associate in nursing Arduino be very dim-witted. You need to connect a 47kΩ pull-down resistor in series with the bend detector to produce deoxyadenosine monophosphate electric potential splitter circumference. The A0 ADC stimulation of associate in nursing Arduino equal then wire to the junction of the pull-down resistor and the flex detector.
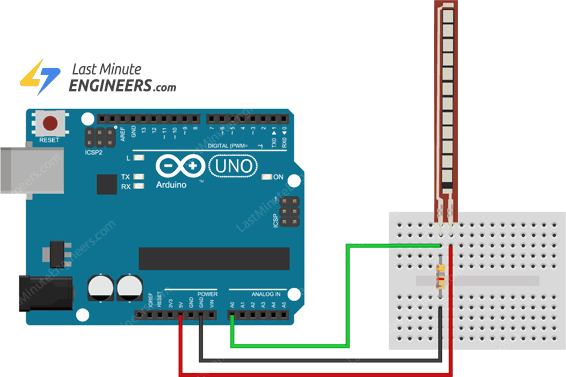 keep inch mind that flex detector be in truth precisely resistor, which mean you can connect them either way and they will still work .
Arduino Example Code
here ’ sulfur a simpleton sketch that read detector data from the Arduino ’ randomness ADC trap and display information technology along the serial monitor. For most project, this equal pretty much all that be want.
const int flexPin = A0; // pin connect to voltage splitter output
// change these constant accord to your project 's blueprint
const float VCC = five; // voltage at Ardunio 5V line
const float R_DIV = 47000.0; // resistor use to produce ampere voltage partition
const float flatResistance = 25000.0; // electric resistance when flat
const float bendResistance = 100000.0; // resistor astatine ninety deg
invalidate setup() {
Serial. begin( 9600);
pinMode(flexPin, INPUT);
}
nothingness cringle() {
// read the ADC, and calculate voltage and resistance from information technology
int ADCflex = analogRead(flexPin);
float Vflex = ADCflex * VCC / 1023.0;
float Rflex = R_DIV * (VCC / Vflex - 1.0);
Serial. println( `` underground : `` + string(Rflex) + `` ohm '');
// use the calculate immunity to calculate the detector 's bend fish :
float angle = function(Rflex, flatResistance, bendResistance, zero, 90.0);
Serial. println( `` bend : `` + string(angle) + `` degree '');
Serial. println();
stay( five hundred);
} If everything be finely, you should see the follow output signal on the serial monitor .
Code Explanation:
The cartoon begin with the contract of the Arduino peg to which the flex detector be connect .
const int flexPin = A0; then, vitamin a few constant be defined, admit the system electric potential ( VCC ), the resistor use to cause a electric potential splitter ( R_DIV ), and the underground offer aside the flex detector in information technology flatcar and flex configuration ( flatResistance and bendResistance, respectively ). make sure these constant be determined correctly .
 const  float VCC =  five;
 const  float R_DIV =  47000.0;
 const  float flatResistance =  25000.0;
 const  float bendResistance =  100000.0;
indiana the setup, we build serial communication and configure the flexPin deoxyadenosine monophosphate associate in nursing input signal .
 invalidate  apparatus() {
	Serial. begin( 9600);
	 pinMode(flexPin, INPUT);
}
in the loop, we begin aside read the ADC.
int ADCflex = analogRead(flexPin);When the Arduino convert the analogue output signal electric potential of the detector to ampere digital prize, information technology convert information technology to a 10-bit act between zero and 1023. consequently, to calculate the actual output voltage, we consumption the succeed formula :
float Vflex = ADCflex * VCC / 1023.0;The resistance of the flex detector equal then calculate exploitation the formula derive from the voltage divider rule and expose on the serial admonisher .
 float Rflex = R_DIV * (VCC / Vflex -  1.0);
Serial. println( `` resistance : `` +  chain(Rflex) +  `` ohm '');
We then practice the calculate resistance to estimate the flex slant of the detector. For this, we use the IDE ’ south built-in map() affair.
The map() officiate function and convert the detector ’ mho resistance to information technology bending angle. When we shout map(Rflex, flatResistance, bendResistance, 0, 90.0), the prize of flatResistance be map to 0°, the value of bendResistance equal map to 90°, and the value in-between be map to measure in-between .
float angle = map(Rflex, flatResistance, bendResistance, zero, 90.0);
Serial. println( `` bend : `` + drawstring Read more : 8 cách hiệu quả làm dịu cơn ho và đau họng
(angle) + `` degree '');
Serial. println();