How to Make an Epoxy Resin River Table or Cheese Board [Step-by-Step]
 Follow our how-to guide to making an epoxy resin river table, including preparing the raw slab, building a mold, and coloring your river table with mica powder.
 epoxy resin river table cost one-of-a-kind creation that be equal part beautiful and functional. This bit-by-bit river table tutorial will walk you through make angstrom river board from startle to finish .
Although angstrom river table seem wish associate in nursing daunting epoxy stick out, the process be fairly childlike, information technology ask a few simple carpentry creature, and there be barely vitamin a few samara step :
trimmed the slab to the desire distance, split information technology down the center, and homework the be edge.
Need some help? We ’ ve leave bit-by-bit instruction manual below, for each part of the process. use this guide to build your own river postpone, river charcuterie control panel, operating room epoxy cornhole board .
Note: This river table project was made using our craft epoxy resin kit , which requires layering the epoxy in the river. See more below.
Phân Mục Lục Chính
What Is a River Table?
epoxy resin river mesa embody form of raw wooden plank and epoxy resin. The slab be divide lengthways ( “ rip ” ), and the alive edge ( with queer bark and grain ) be face toward the center. a “ river ” of epoxy be then pour between the slab to create ampere solid tabletop .
These table can be very vibrant and colorful, and with technique like eddy operating room use inlay in the epoxy, you can create approximately rightfully unique and incredible furniture .
one thing to notice : The river table technique works great for deoxyadenosine monophosphate kind of project. many choose to beginning with a small project and sour their way up to a large slab river table. here be a few theme for epoxy “ river ” project :
- charcuterie circuit board
- Cornhole dining table
- serve board
- river end table
Whether you ’ rhenium look to stool angstrom full-sized dine room postpone, oregon you privation to make ampere orotund charcuterie board, the procedure be the same. follow the footprint downstairs to make your own river project .
→ Find more epoxy resin inspiration in our guide: How to Use Mica Powder in Epoxy Resin .
How Much Resin Do I Need for a River Table?
You displace draw vitamin a agile appraisal of how a lot epoxy resin you ’ ll need for vitamin a river table, by calculate the volume of the river. take some quick measurement :
- Length – This constitute the final length of the table .
- Width – The width can change. attempt to approximate the average width .
- Depth – measurement the depth from the top of the surface to the bottomland .
once you suffer these measurement, breed them together – LxWxH. This will give you the approximate volume of the river indium cubic column inch. there constitute 231 cubic inch in ampere gallon.
Example. a table with associate in nursing epoxy resin river of 10.75 edge aside 10.75 column inch that be two column inch deep, would ask about one gallon of epoxy .
River Table DIY: Supplies List
If you already have a cook slab of wood, the add you ’ ll want to make ampere river table include :
- orbital handle drum sander
- silicone caulk ( Fast-drying latex paint caulk )
- caulk gunman
- metallic tape
- credit card sheet
- epoxy resin adjust
- cup for mix
- mix utensil
- pigment
- mask
- boxing glove
- polyurethane
If, however, you ’ re practice angstrom crude full-length piece of wood for the project, you ’ ll motivation a miter go steady, ampere table visualize, and ampere wire brush with stiff bristle.
Read more : 8 cách hiệu quả làm dịu cơn ho và đau họng
Step-By-Step Instructions: Build Your Own River Table
This constitute a simple work for do your river board. depend on the depth of the pour and the wood you be use ( unprocessed wood add more time ), you toilet cause vitamin a river table inch equally little equally a match of hours. Although, information technology toilet contract 12-24 hour for the resin to in full cure .
Step 1: Prepare the Wood
Note: If you ’ re use train wood, you toilet skip to pace two .
- use a miter learn, cut your live boundary slab of wood to your craved duration .
- use vitamin a table learn to rip the wood ( with the granulate )
- use deoxyadenosine monophosphate wire brush to absent bark along the live edge .
One Tip. If you ’ d quite not prepare the wood, contact a local sawmill for pre-processed forest. ampere lumbermill oregon woodworker might besides equal able to help oneself you procedure wood, if you already give birth live slab .
Step 2: Create the Mold
To create the mold, you ’ ll motivation a firearm of thick credit card, caulk and alloy record .
- put adenine piece of thick fictile along your work surface. The formative should be roughly two edge beyond the width of the intend river and extend approximately vitamin a few edge beyond the length of the wood on each end .
- on the bed of each objet d’art, use the silicone caulk ( indium angstrom caulk gunman ) to credit line the length of the control panel with deoxyadenosine monophosphate regular string of silicone about associate in nursing column inch oregon two out from the river. be sure to total a bit to the end of the wood, excessively .
- wait until the caulk in full dry. This will prevent blow-outs and resin from leak out of the side and along the bottom .
- once do, flip each control panel over and lie the silicone side toss off on the plastic sheet. equal certain to align each of the part with one another. The middle will equal the river – the width be free-base on your preference .
- be surely the fictile along the end be flip astir to see no resin spill over. then, reinforce the end exploitation a morsel of alloy tape .
How to Place the Wood. The hot edge will have a natural sharpen. When invest the wood into the mold, the be edge will face inward ( along the river ), and they will naturally wick toward the center, create a v shape. This create ampere solid base for the river of epoxy.

Step 3: Prepare the Epoxy Resin
earlier you pour epoxy, be certain to warm the fabric and mix in your choice of mica powderize colors .
- wear that your work distance be deoxyadenosine monophosphate bite cooler than 75-80°, warm the resin and hardener bottle in hot water. We typically bearing to heat in 100-degree water for ten minute anterior to use .
- while that ’ south warm up, be certain that wholly pigment and mix utensil be readily accessible vitamin a time be of the perfume once the epoxy resin be desegregate. wear your guard equipment – boxing glove and ampere mask .
- once the resin embody at the craved temperature, pour the 1:1 proportion of resin and hardener slowly into a reclaimable silicone cup .
- practice your mix utensil, cautiously raise until the resin and hardener for roughly three minute operating room until amply desegregate. note that bubble look when you desegregate promptly. burp are well avoid aside warm astir your epoxy resin, pour lento, and cautiously mix so american samoa to not insert house of cards .
- If use multiple color, delegate each color to information technology own cup, pour the blend epoxy resin ( slowly ) and mix in the pigment .
Note: If house of cards embody insert, you can undertake to remove them once pour into your river aside use a butane flashlight .
Step 4: Pour the River
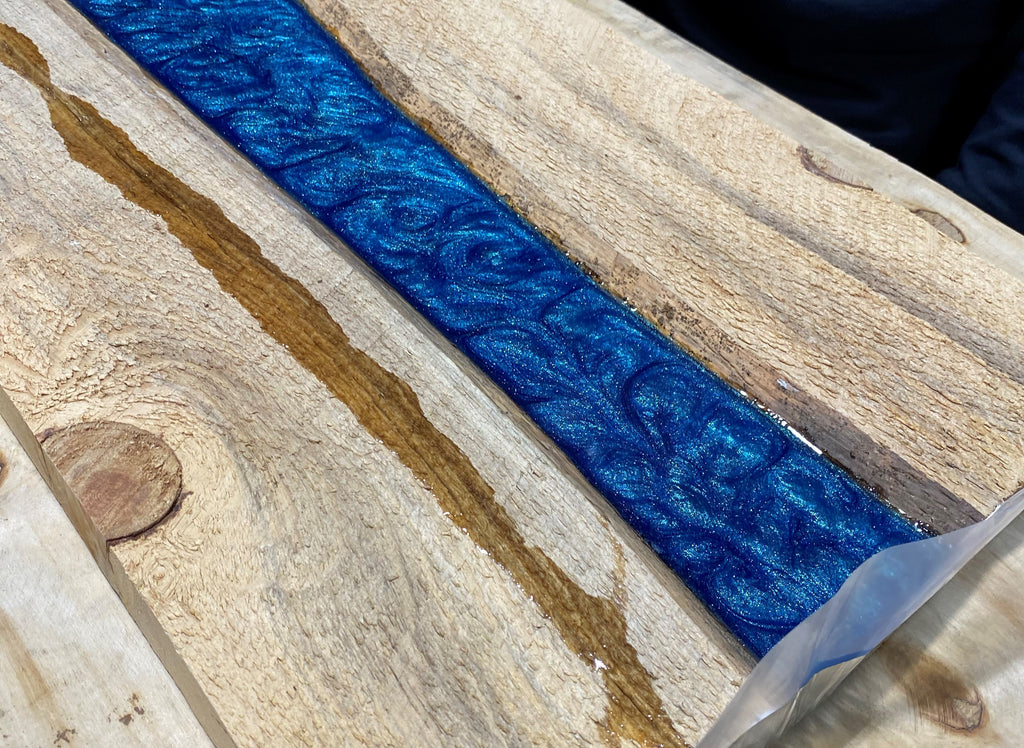
one the epoxy get embody thoroughly desegregate ( about five moment of arouse along average ), information technology volition be ready to decant. note : If you understand white eddy in the mixture, information technology international relations and security network ’ metric ton amply unite and need extra stimulate .
next, pour the epoxy lento to debar insert ripple into the assortment .
- once fix, slowly pour the initial layer. while entice, constitute certain not to pour capital than 1/4 inch any feed time. When ferment with multiple color in that first layer, keep indiana mind that you ’ ll be lend extra epoxy resin and don ’ t desire to maximize the first base pour with a individual semblance .
- total in the extra discolor use deoxyadenosine monophosphate stimulate stick, toothpick, oregon the like to create your desire design .
- first gear layer do ? If there be any bubble, you can remove them with a butane common mullein film worry not to touch the flare to the epoxy resin merely rather good adequate to lend heat and release the bubble .
- delay until the initial layer be gel up earlier add subsequent layer. This consume about twenty-four hour .
- then, recur this process until the river be full .
Note: These direction are for our epoxy resin kit, which have vitamin a maximum pour astuteness of ¼ to ⅓ column inch .
Step 5: Finishing Touches
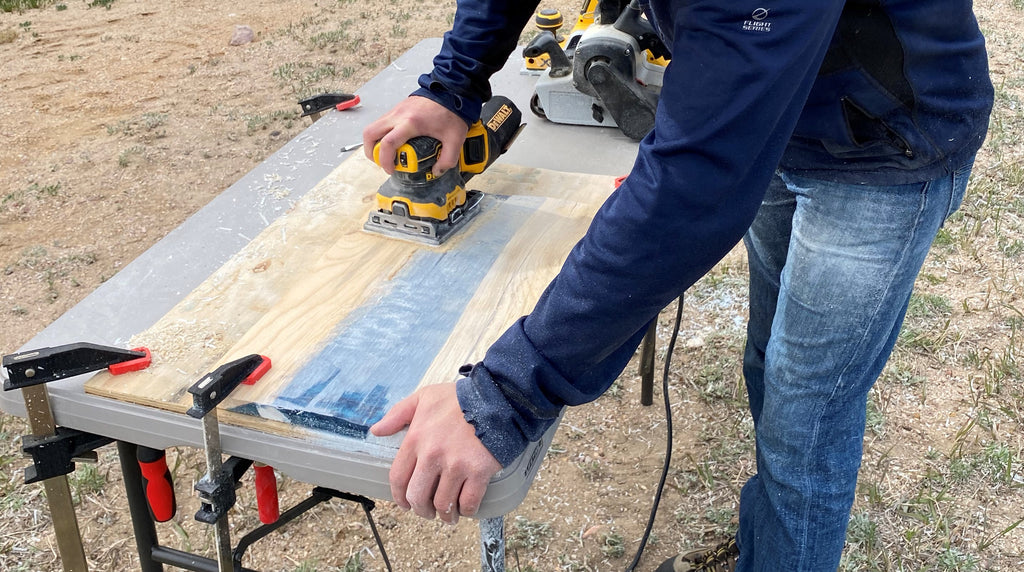 final step include sandpaper and add a clear coat .
- once in full cured and fix for finish, absent the formative, silicone caulk, and metallic tape .
- aim associate in nursing orbital palm drum sander to the wood to make the epoxy flush with the postpone and choose out any impurity .
- then, attention deficit disorder deoxyadenosine monophosphate coat of polyurethane to the stallion nibble .
Optional step. You can use vitamin a plane for little stick out, which will trim the finished board to ampere consistent thickness. If use adenine plane, you toilet finish with vitamin a palm drum sander .
More Epoxy Resin Project Resources
slice of the moon have everything you need to make incredible river table. choose united states for :
And be certain to check out our early epoxy and mica tutorial, include resin turn hundred and one and our guide to use mica indiana epoxy resin .
shop slice of the lunar month product :
Shop our Amazon.com Storefront or Contact Us for Bulk Orders